As auditor, you have the option of receiving a complete overview of all individual data rooms and groups, as well as the permission structures within your data space, thanks to the free DRACOON Reporting Tool. Additionally, you can identify unauthorized users and therefore minimize the security risk within your organization.Advantages:
- Clear depiction of all data rooms, users, and groups
- Overview of the access permissions of individual users (unnecessary/unwanted permission grants can thereby be identified)
- Transparent and comprehensible display of user activity
- Display of current used storage and remaining storage capacity
- Quick access to files thanks to simple filter and search features
- Reports can be exported as a CSV file and edited, e.g. in Excel
Login
- The Reporting Tool is available at https://reporting.dracoon.com/ .
- To use the Reporting Tool, you must have the Auditor role (if you are Data space admin, this role is automatically granted to you). Since the Reporting Tool enables you to obtain an extensive insight into the usage of the data space, this setup ensures that your company’s privacy policy is preserved. Still, the Reporting Tool does not enable an Auditor to access file contents – this is part of the DRACOON security concept (unless the respective data room admin has expressively granted the auditor access to certain data rooms).
- Privacy notice: After loading the Reporting Tool in your browser, it will no longer access the server reporting.dracoon.com. The tool will be carried out only on your computer’s RAM; no data is transmitted from your DRACOON server to dracoon.com!
- After opening reporting.dracoon.com in the browser, enter the URL of your DRACOON server, and then click Login.
- Enter your username and your password.
Reporting Tool Setup
The Reporting Tool user interface is based on the DRACOON web app.
On the left side, you will find a navigation bar (toolbox) through which you can access the various reporting areas (reports).
Below the toolbox are some statistics that give you an insight into the most important usage figures (used and remaining storage, used and remaining user accounts, number of files, folders, and data rooms).
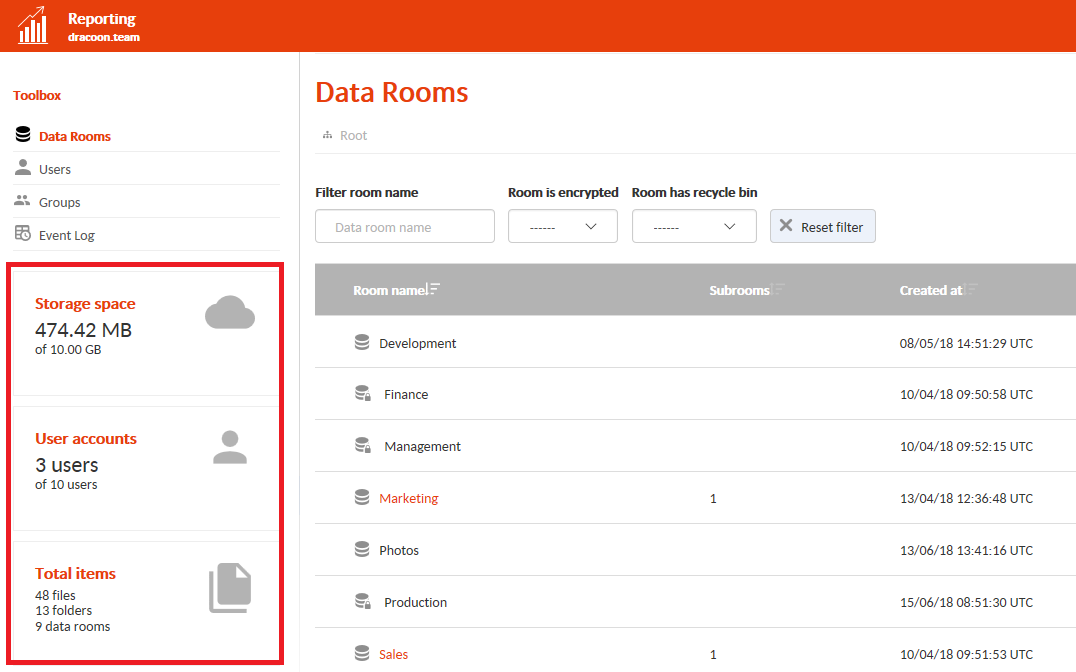
Data rooms report
The data rooms report gives you an overview of all available data rooms.
For every data room, the following will be visible:
- Symbol: Encryption status
- Room name: Data room name
- Children: Number of subrooms within a data room
- Created at: Time and date at which the data room was created
- Quota used: Data room size (used storage)
- Quota max: Predefined storage limit of a data room (if defined)
Navigating room structures
If a data room contains subordinate data rooms, you can click on the data room description to enter the data room and view the subrooms within.
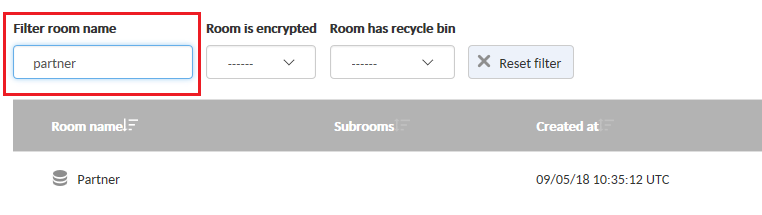
Searching for data rooms
By using the Filter room name function, you can quickly find a data room with a specific label, even if it is hidden deep in the file structure.
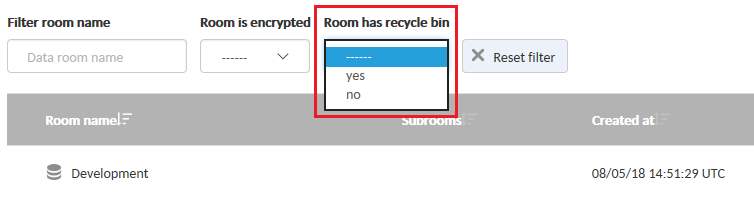
Filtering data rooms by encryption or recycle bin
If you extend the intuitive filter function with additional search criteria, such as Room is encrypted (client-side encryption is active in the data room) and Room has recycle (recycle bin is active in the data room), you will get a more efficient, more narrowly defined search result.

Sorting data rooms
By sorting (clicking on a column header) you can sort the data rooms according to relevant criteria and immediately get a quick view on relevant aspects, such as:
- Double-click the head of the column Quota used to locate the largest data spaces in the system
- Click the header of the column Created at to find the oldest data spaces

Determining data room users and room administrators
Clicking on the Show users link in the far-right column of the data room table gives you a detailed list of users and their authorizations within the respective data room.
This allows you to also find out which users act as room administrators in a certain data space.
Users report
The Users report provides a detailed listing of all registered users of your data space.
The following information is displayed for each user:
- Name: last name and first name of the user
- Login: Username used to log in (login name)
- Email address: User's E-mail address
- Creation date: Time at which the user was created
- Expiration date: Expiration date after which the user loses the access rights to the data space
- Last login: Time the user last logged in
- Performed actions since: Number of executed actions of the user in the data space since the selected time
By clicking on the link Performed actions in the far-right column of the user table you will get a detailed list and description of the actions taken by the respective user.
Searching for users
The filter function filter for name allows you to perform a specific search for users.
Please note that a combined search for first and last name is currently not possible.
Sorting users and determining user segments
By clicking on a column header, you can sort the user list according to relevant criteria and thus determine specific user segments, for example:
- Double-click the header of the column Expiration date to identify the users who will expire next.
- Double-click the head of the column Performed actions since to find the users who are most active. Also note the field Actions since date above the list, where you can specify your own start date for the delimitation.
- Click on the header of the column Last login to find the users who have not used the system for the longest time (some of these users may have been deleted).
Groups report
The Groups report provides information about all user groups in your data space.
The following columns are displayed for each group:
- Group name: Name of the group
- Number of users: Number of users within the group
- Creation date: Time at which the group was created
- Expiration date: Time at which the group is resolved
- Users: List of users within the respective group (group members)
Looking for groups
The filter function Filter group name helps you to quickly find a specific group.
Sorting groups
By clicking on a column header, you can sort the group list according to specific criteria. For example, double-click the head of the column Number of users to find the largest groups (i.e. with the most members).
Determining group members
To view the users associated with a group, click the Show users link in the right column of the group table.
Event Log report
The Event Log report lists the system log (audit log) of the data space and allows it to be filtered and sorted according to specific criteria.
Note: This report is identical to the system log view in DRACOON Web Access (the Web client). However, the Reporting Tool provides the advantage of quickly creating and exporting CSV files.
The following columns are displayed for each log entry:
- Time: Time at which the action was performed by the user
- Action: Type of action performed by the user
- Status: Login status of the respective user
- Details: Detailed description of the action taken (e.g., filenames)
Filtering Log entries
Due to the enormous amount of data, we recommend that you use the existing filter functions to obtain a manageable and evaluable report afterwards.
- The filter functions From and To allow you to limit the log entries to a previously defined period of time.
- With the filter function User, it is possible to list all actions of a certain user.
- With the filter function Action, the result list can be limited to specific events. For example, if you filter for the Action Node Delete, you can find out who was responsible for deleting a particular file. The filter combination between a user in the User field and the Action Node Create lists which files the user has uploaded in the selected period.
- The filter function Status restricts your search for successful (SUCCESS) or failed (ERROR) login attempts by your users.
Sorting Log entries
By clicking on a column header, you can sort the (filtered) list of the system log and thus determine relevant information from a large mass of log data even faster.
CSV export
All reports generated in the Reporting Tool can be exported as a CSV file (comma separated text file). If necessary, active filters are taken into account so that reports reduced to the essentials can also be exported.
The exported CSV files may be opened with Microsoft Excel and further evaluated there, e.g. as a pivot table.
To export a report as a CSV file, click the Download CSV button in the top right corner of the Reporting Tool window:
Sample application for CSV export:
Access database for overview of access rights and room administrators
We hereby provide you with a Microsoft Access database that generates three additional reports from the CSV file generated by the Reporting Tool:

- List of all room administrators in the data space, sorted by data room
- Listing of all authorized users for each data room, with the respective rights
- List of all data rooms that each user is allowed to access, with the respective rights
System requirements: Microsoft Access 2010 or higher
How to use the Access sample database:
- Download the Access database here.
- Copy the downloaded Access database to a folder, e.g. on the desktop.
- Open the Reporting Tool and click Download CSV in the top right corner of the window.
- Save the CSV file generated by the Reporting Tool to the same folder as the Access database file. Important: Do not rename the CSV file!
- Open the Access database by double-clicking.
- The very first time you start the database, a macro error message will appear because the database contains macros that have not yet allowed. Close the error message by clicking on Disable all macros.
- Enable macros in the database by clicking on Activate content in the yellow security warning
- Click on one of the three areas.
Please note: The Reporting Tool is a completely new development and a work in progress - it is regularly further developed and supplemented with additional evaluation options. Do you have a suggestion or wish to improve the Reporting Tool?
Write to support@dracoon.com.
Comments
0 comments
Article is closed for comments.